Showing posts with label DIY. Show all posts

Monday, November 18, 2013

DIY maxi skirt

I made a maxi skirt a couple months ago and forgot to post about it. I found this cute fabric at hobby lobby and decided it would be perfect. All you need is fabric and a sewing machine. 

I already had a skirt to use for the pattern. Once I ironed the fabric and placed the outside pieces together I laid my "pattern" on it and cut it giving myself half an inch extra on both sides. 
I wanted my skirt to fold down so I placed two thick pieces together, sewed them and attached them to the top of the skirt. 

Thursday, October 17, 2013

DIY headband

The knot headbands have been on my brain recently. I hadn't been able to find any that I just loved or weren't $20 each so I decided to make some!  
You can use almost any kind of fabric!  
The sky's the limit!

Thursday, April 25, 2013

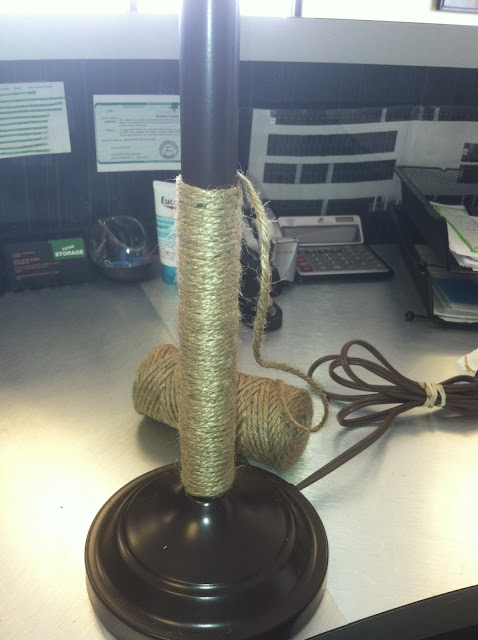
DIY Twine Lamp

Joel and I have had the same generic bedside lamps sense we got married. I've been wanting to buy some new ones but we are on the 9 month count down of moving out of Utah so I'm trying to not buy any more home decor stuff.
So, I thought the best idea was to just spice up our already existing lamps. 
I had some left over twine and glued the tip and began wrapping it.
It took me all of 3 minutes per lamp and I think it adds a little something!
I love when the project is free!

Wednesday, April 17, 2013

DIY Tack board

I had an already existing tack board that was very plain Jane that I picked up from a garage sale for $2. I had spray painted it red to go with the other stuff in my kitchen, and there it sat.... When I decided to redo my silverware frames Here I also thought it would be a good idea to spruce this little eye sore up.
It's pretty simple and you most likely don't need a step by step but here you go. 
1. Take apart Board. 
2. Cut the size of fabric you need to wrap around board and glue in back.
3. Iron and glue fabric in place
4. Find cute little embellishes to add to the board
Put it all back together and Wahlaa! You have a fun place to put wedding, Christmas and birth announcements!

Monday, January 21, 2013

DI Spice cabinet

I picked up this little gem at DI last week. When I bought it I had no idea what to use if for and originally was going to take out the shelves until I thought about turning it into my spice rack! My old spice layout was really disorganized and I ended up re-buying a few spices due to not seeing I had them already. 
I started by taking to door off and giving it a nice all around sand
Then I added the first coat of grey
After a few coats and letting it dry over night I began to sand it 
I usually get to excited to let it dry a full 12 hours and end up not achieving a good sand due to tacky paint. This little beauty sanded like a champ when I let it actually dry. Who'da thunk?!  
Finally I loaded up the shelves and put it on my counter.  
I just Love the way it looks in my kitchen! I'm still thinking about lining the shelves or back drop with fabric or scrap booking paper. Either way I love my $6.00 Shabby Chic spice rack!

Wednesday, January 16, 2013

DIY Bottle Vase

On Saturday I was feeling super craft and didn't have any projects lined up. So when I spotted this boring bottle on my shelf and remembered the extra twine I had left from a different project I knew just what to do!

Honestly the pictures are self explanatory.
Glue the end of the string to the bottom of the bottle and just start wrapping.

Gluing every 6 wraps or so. 
After that just plop something in it and waaala! A fun new spiced up bottle!

Wednesday, October 3, 2012

DIY Vanity

Joel and I had this deck from our Studio apartment that we have not been using due to our build in desk at our new place. It has just been sitting in our 2nd bedroom collecting dust so I decided to transform it into a vanity! 
This is a picture of it after it was sanded. 

3 coats of white paint later.


After the 3 coats of white paint it got ruffed up a little!
I got this mirror at Thai Pan for $20 and just knew it would be my vanity mirror!

I am so pleased with the way it turned out! I am on the prowl for a stool now!

Wednesday, June 20, 2012

DIY Dresser...

This Dresser was almost the death of me.... Honestly, I almost threw in the towel and dropped it off at the dump multiple times... I picked up this little piece at DI the other day and thought it would fit on this empty wall that I've been wanting to do something with for some time now.   


This pictures doesn't do the nasty yellowed white color justice. Also it came with drawers I was just to lazy to put them back in for the picture. 


I painted the whole thing then realized I wanted to make shelf's out of the drawer spaces and needed to paint the inside. 

I'm glad that it turned out kinda like what I was going for but honestly this project was frustrating to say the least....

Wednesday, May 30, 2012

DIY silverware frames

*UPDATE: I decided the blue was not my favorite nor was the fabric I originally picked out.... This is the revised project!
Now that we are in a bigger place I have all this extra wall space that I need to fill! I wanted to do something on my kitchen wall that was simple but also cute. I decided on this little project.

First off go to DI and pick up three picture frames and Silverware. Then run over to hobby lobby and get a couple pieces of cloth and spray paint! 

I didn't take any step by step pictures and for that I'm sorry but here is a step by step on what to do!
1. Spray paint silverware and picture frames
2. Glue fabric on frame backer
3. Glue silverware on fabric and ......WALLAH 
You have cute little kitchen decorations!
I'm not 100% sold on the blue frame and that plate needs another coat but all in all I like it!
P.S. I had a gross old cookie sheet so after a little spray paint I was able to use it as a magnet board!


Saturday, May 26, 2012

DIY bench

I went to DI the other day to see what treasure would jump out at me. When I was looking around I saw this little beauty and thought "Hmmm... I'm sure I could use that in our entry way". So I snagged it and brought it home to transform!I wasn't sure what color I wanted it or what to do about the wicker baskets so I just started. 

First I sanded it.


Then when I went to Lowe's I saw this pretty blue and thought "What the heck"


After a few coats of paint, Knobs from Hobby Lobby and a couple pillows I am very pleased with how it turned out!